The stucco or snow effect shows a property feature not in use up to now in the field of decorative pastes - a swelling of the paste after its spreading onto the substrate.
By means of this process, it becomes dead easy to conjure up soft winter landscapes with perceptible snow heights.
The stucco effect is available in 35 different basic hues, which can be mixed with each other at any ratio to yield countless new shades.
main application fields:
- modelling
- structuring and shaping of paintings
![]()
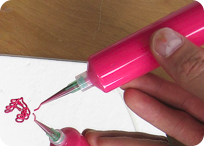
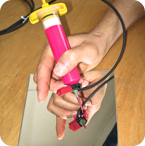
Figure 1: Working with the outlining paste
Before applying the outlining paste (Figure 1), the cartridges have to be filled at first.
As it is very awkward and time consuming to fill the paste into the cartridges just by the use of spoons or spatula, and air is included into the cartridges also by such a method, we decided to develop a more appropriate system.
 |
 |
| a | b |
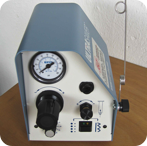
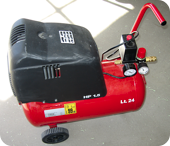
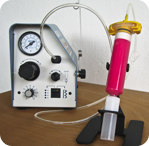
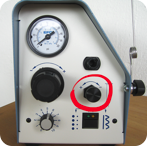
Figure 7: a) dispenser, b) compressor
Similarly to the filling of the cartridges we found out that expressing the paste from the cartridges just by hand or by the use of spatula is not professional, since it does not always promise reproducable results. Therefore we suggest the use of a pneumatic dispenser (Figure 7a) that originally was invented for precise application of liquid seals onto e. g. computer circuit boards. Air pressure is created by a small compressor (Figure 7b) or obtained from the compressed air pipe in your company.
 |
 |
| a | b |
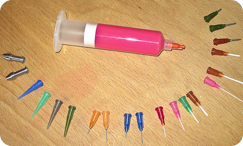
Figure 8: a) connecting cartridge and dispenser,
b) various types of nozzles
Before starting to work, the filled cartridge must be connected to the air dispenser at first. This is achieved by screwing an appropriate adapter to the back end of the cartridge (Figure 8a). Then, the blind needle on the cartridge front end is replaced by the desired nozzle for working (Figure 8b).
 |
 |
 |
| a | b | c |
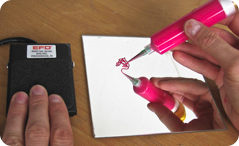
Figure 9: a) foot trigger pressed, paste flows, b) finger trigger pressed, paste flows, c) trigger let off, paste flow stops
Upon that you can start to work. Release of air pressure from the dispenser towards the cartridge back end is achieved by pressing the foot (Figure 9a) or finger trigger (Figure 9b). Now, the paste flows. In order to stop the flux, simply let go off the trigger (Figure 9c).
 |
 |
| a | b |
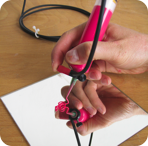
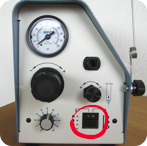
Figure 10: a) pullback of the stopper prevents from dirtying,
b) adjustion of underpressure at the dispenser
It is very important that the paste flux out of the cartridge stops immediately after stopping to press the trigger. Else, your design would be soiled by paste still purging out of the cartridge. Such a dirtying is prevented by pre-adjusting a certain underpressure that will be applied to the cartridge back end. This way, the paste will be pulled back a little into the cartridge (Figure 10a). The underpressure can be adjusted at the dispenser also (Figure 10b)
 |
 |
 |
 |
| a | b | c | d |
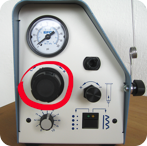
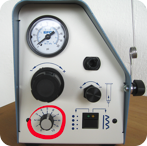
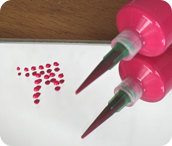
Figure 11: a) adjusting the paste flux, b) switching to the discontinuous mode, c) adjusting the flow time, d) creating of dots of equal sizes
The dispenser allows for infinitely variable air pressure (paste flux) control (Figure 11a).There is also the possibility to work in a discontinuous (dot making) mode (Figure 11b). In the discontinuous mode, air pressure and flux are stopped not by letting go off the trigger, but by the dispenser itself. The paste flow stops automatically after a certain time and can only be restarted by pressing the trigger again. The time window of paste flow can also be adjusted (Figure 11c). This mode allows for the deposition of dots or other decorative patterns of exactly equal size (Figure 11d).